Overview
This is the third post in the Installing and Configuring Citrix XenApp 6.5 Series:
- Install and Configure Citrix XenApp Licensing
- Install and Configure Citrix XenApp 6.5
- Configure Web Interface for Citrix XenApp 6.5 (this post)
- Publishing Applications with Citrix XenApp 6.5
- Install and Configure Profile Management for Citrix XenApp 6.5
- Add Servers to a XenApp 6.5 Farm
- Configure Pass-through Authentication for Citrix XenApp 6.5
- Install and Configure Citrix Secure Gateway
Contents
This post contains the following sections:
- Create XenApp Web Site
- Configure XenApp Web Site
- Create XenApp Services Site
- Configure XenApp Services Site
- Enable Client Downloads
Create XenApp Web Site
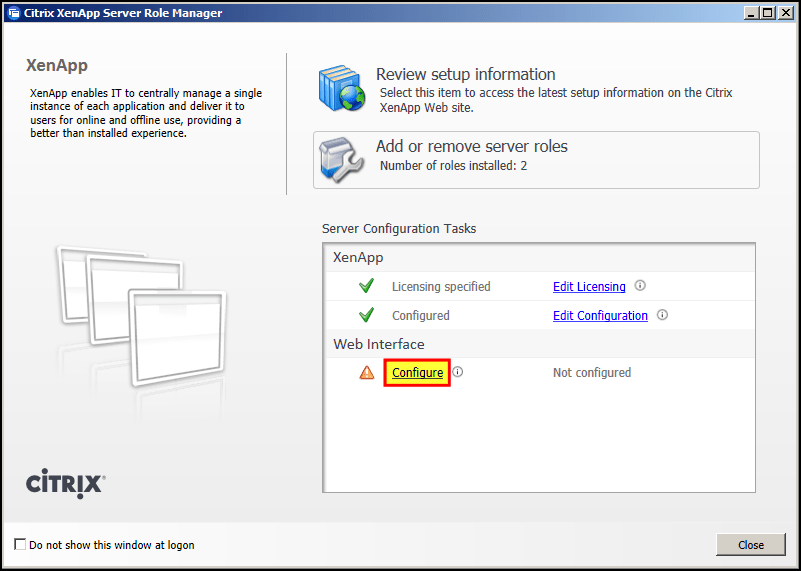
- Click Configure under Web Interface:

- Right-click XenApp Web Sites > Create Site:

- Leave the default Path and Name, but tick the Set as the default page for the IIS site tickbox:

- Click Next, accepting the default At Web Interface for the Point of Authentication:

- Review summary information, then click Next:

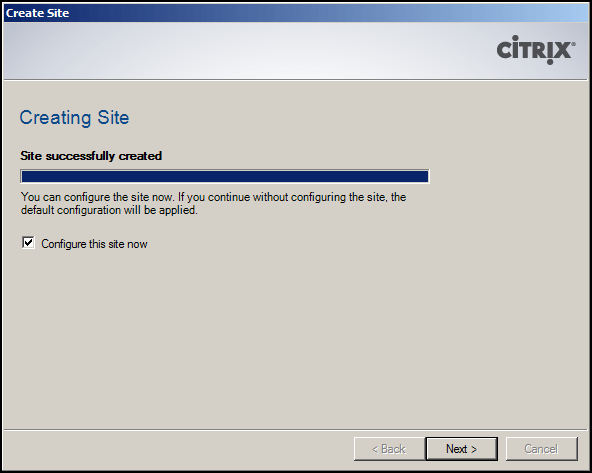
- Click Next to Configure the site now:


Configure XenApp Web Site
- Continuing from the Step above, enter your Farm name (eg. CTXFarm) and your XenApp servers (we only have CTXXA01 at the moment, but will add more later):

- Select Authentication Methods (eg. Explicit and Pass-through):

- Add your Domain to the list:

- Select Full:

- Select Online:

- Review summary information, then click Finish:

- Your site will now appear in XenApp Web Sites:


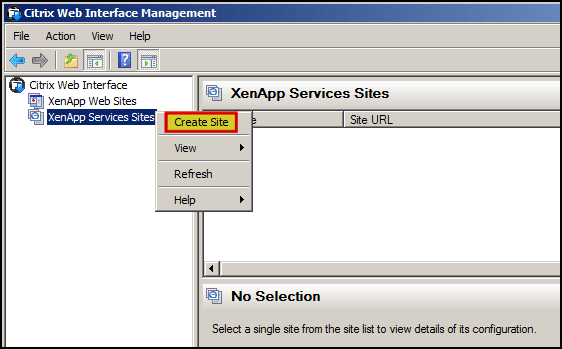
Create XenApp Services Site
- Right-click XenApp Services Sites > Create Site:

- Accept the defaults, click Next:

- Review summary information, click Next:

- Click Next to Configure the site now:


Configure XenApp Services Site
- Continuing from the Step above, enter your Farm name (eg. CTXFarm) and your XenApp servers (we only have CTXXA01 at the moment, but will add more later):

- Select Online, click Next:

- Review summary information, click Finish:

- Your site will now appear in XenApp Services Sites:


Enable Client Downloads
- Copy \Citrix Receiver and Plug-ins\Windows and \Citrix Receiver and Plug-ins\Mac folders from the install DVD/ISO to C:\Program Files (x86)\Citrix\Web Interface\5.4.0\Clients:

- Navigate to Web Interface Management > XenApp Web Sites > Edit Settings > Client Deployment > Properties > General > Client Detection and tick Offer upgrades for clients:


- Edit C:\inetpub\wwwroot\Citrix\XenApp\conf\WebInterface.conf file
- Uncomment the lines for the required clients (eg. windows and mac):
- # ClientIcaMac=Filename:Citrix online plug-in (web).dmg,Directory:Mac,Mui:Yes
- # ClientIcaWin32=Filename:CitrixOnlinePluginWeb.exe,Directory:Windows,Mui:Yes,ClassID:238f6f83-b8b4-11cf-8771-00a024541ee3
- Rename Filename to client in folder eg. CitrixReceiverEnterprise.exe (use Enterprise for features like SSO):
- ClientIcaWin32=Filename:CitrixReceiverEnterprise.exe,Directory:Windows,Mui:Yes,ClassID:238f6f83-b8b4-11cf-8771-00a024541ee3
- ClientIcaMac=Filename:CitrixReceiver11_4_3.dmg,Directory:Mac,Mui:Yes

- Run IISRESET from the command prompt.
- Open a browser and navigate to Web Interface. Tick I agree with the Citrix license agreement, then click Install:

- A message should appear, telling you to watch out for an information bar:

- Click Run when it appears:

- Click Allow:

- Once installation has completed, click OK:

- Click Allow if this warning appears:

- The above warning should not appear if you put your Web Interface server (eg. http://ctxxa01) in Internet Explorer > Internet Options > Local Intranet Zone:


- At this point, Citrix Receiver will ask if you’d like to enter a URL:

(You can disable this prompt if required: http://support.citrix.com/article/CTX134637) - You should enter the Server for your XenApp Services Site:

- Behind the scenes, the full URL of your Services Site will be used, with config.xml appended to the end.
You can view this by right-clicking the Citrix Receiver icon in the Notification Area > select Preferences > Plug-in status > right-click Online Plug-in > Options:


- Application shortcuts will now appear in the Start Menu and Desktop, if configured.


Dear Mr. Rush, I am a Product Support from a software development company in China and now doing a compatibility testing between Citrix XenApp6.5 with our product. And your articles help me a lot to go through the complex installation and configuration of the program. But just after configuring the Web Interface and restart the machine, all menu items under Citrix folder in Start Menu are gone!!! They were still there when I configured License Server. Do you have any idea about how it happened? Could you please give me any help on this? Thanks a lot! Best Regards, Sue
Hi Sue
Glad to hear you found my posts useful 🙂
I’ve seen menu items move too. Have you checked for the Citrix folder in Administrative Tools?
Yes, I could see them there… Why they are moved to such place? They are Citrix application, not Windows’… Thanks a lot for this! Have a good day!
Hi Adam,
Helpful posts by the way. Thank you!
I just want to verify the step after editing the WebInterface.conf. I uncommented and renamed the filename in Notepad, do I save to the original file, and then restart IIS?
Yes, save the file and run “iisreset” from command prompt. You may have to run notepad as an Admin to save file though.
Hi rush,,
You posts are really usefull can you post something related to webconfig file such as client id mapping and some other stuffs.it would be really greatfull.Thanks.
Amazing post…………………..thanks a lot for posting this
Hi Adam ,
I installed and configured the web interface exactly the steps above , but after IISRESET , i navigate to browser and i got the Green INSATLL button but not the “Agree to license” check box. When i click on the install button another IE window opens which tells me to download from http://www.citrix.com/download , is am going right ?
Note: i copied the clients to the respective folders and modified the file as mentioned above.
Thanks,Mayur
I’d double-check the client filenames in the WebInterface.conf file.
Excellent post..Thanks..It’s help full to all